Disclaimer: I probably have horrible grammar. Also, this is just how I retexture hair. It may not be the best or most perfect way, but you asked how I do it so here goes.
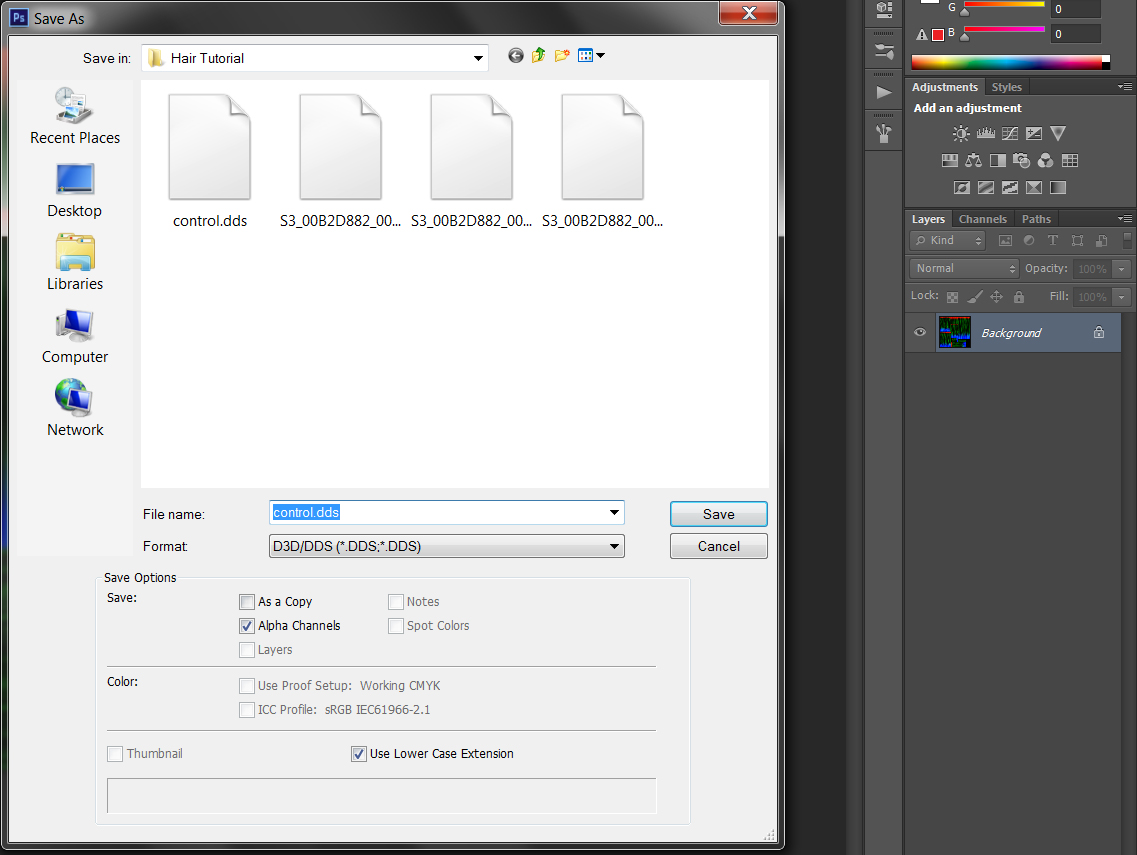
I forgot to mention this in the tutorial but your DDS settings when you save should look like this:

Welcome to my tutorial (as requested) on retexturing hairs for The Sims 3. This may also work for The Sims 2, but I really cannot swear that because I have no idea. First things first is we'll need a few things, so gather your materials and let's get started!
Note: Though this tutorial is all about retexturing hair, I'm going to tell you all the steps required for extracting/replacing/saving/cloning. This is because most people have never used these programs and might only need them for these purposes. Leave no man behind, right?
First of all, we'll need s3oc to make sure our projects are unique so that people could have multiple versions in their game if they wanted to.
So download that and install it and then move on to step two.
Next what you'll need is the s3pe. This is what we're going to use to replace the textures/CAS thumbnail. Now, you can do this with TSRW, but it usually won't let you replace the specular and that makes my hairs look odd for some reason. o_O
Now you're going to need a type of image editor. I'm using Photoshop CS6, but it should work in Gimp so if you know how to use Gimp (which is free, but so is Photoshop CS6 if you know where to look....*ahem*) then you should be able to follow along. You'll also need a DDS plugin for your program, so search for that, I don't know where the Gimp one is, but you can find the one for Photoshop here.
You're also going to need textures and a control. I am using Pooklet's textures, I just edited out the shine. You can find Pooklet's textures here. But you can use any texture you want, make, or have. It's all up to you! You'll also need a control, I use Anubis' control found here. Scroll down, bottom of the post it says control base.zip. Download that.
Last but not least you'll probably need Delphy's multi extractor. That's what you'll need to follow this tutorial, but I'm going to tell you something that might make following a little easier.
Usually you can get browser extensions (chrome or firefox, Idk about IE) called something like, hoverzoom or something of that nature. It makes it easier because you can just mouse over the pics and it'll make it bigger. If not you can just click to make them bigger. Okay, let's get started.
The hair I'm going to use for this tutorial is this one. You can use the same one to follow along if you wish, so you'll know you're on the same page as I am.

Also that tumblr has a bunch of the hairs for free so bookmark that because it'll become a very valuable resource for you as a hair retexturer.
Make a folder on your desk, name it something, doesn't matter what. You can name it I LIKE EGGS if you want, I'm naming mine hair tutorial.
First question is; is your hair in a sims3pack? If so, continue reading, if not, skip to step 1.
Note: Now this particular hair (from that website) is for adult females only, but the same things apply to all the ages/genders, so it should be easy to do them without a tutorial.
Open Delphy's multi extractor, from now on to be referred to as DME.

Click both 'browse' buttons and browse to your I LIKE EGGS folder or whatever you named it. Then click extract. When it's done close it.
Now open s3oc.

1. Click file.
2. Click Open Package (browse to your package you just made with DME, should be a bunch of random numbers/letters it's in your I LIKE EGGS folder)
3. Highlight it here when it opens.
4. Click 'clone or fix'.

5. Check this to create a clone of your 0xwhateverthehellitsays01230812938
6. Check this so you can change the CAS thumbnail.
7. Check this so you can make it unique.
8. Type here what the package will be named. Make it unique, okay? Mine has ZC at the first because, well, Zombie Chick and also it's unique I do believe.
9. Click start.
Save it in your I LIKE EGGS folder and wait for it to get done. Might take a while, that is okay.
When the little box says 'Your updated package is ready' click OK and then exit out of s3oc.
Open your I LIKE EGGS folder and double click on your file that you just made. Like, mine would be ZCNewSeaShainAF. It should open in s3pe.

10. Highlight the img files (and the THUMB if it's in there, this one apparently didn't have a THUMB file, that is okay, I'm going to show you how to add one!)
11. Right click the highlighted files, go to export.
12. To File...
Save these in your I LIKE EGGS folder, close s3pe.
Open your image editor.
File > Open > I LIKE EGGS

Highlight these three files and click open. (You can do this by dragging your mouse to highlight them, holding ctrl and clicking on each of them, or clicking the first, holding shift, then clicking the last. Whichever is easiest for you.)
We're going to do the control first, so open your control.
Apparently the hair we downloaded up there was a retexture. If so, then I guess we are retexturing someone's retexture. What even? Oh well.

13. Click this and drag it to get a little section. Then hit CTRL + C (for copying on a pc, I don't know about a Mac)
Open your control tab for the hair you're retexturing and hit CTRL + V.

Ours is the big one in the middle. Hit V and then move it into place over one of the squares. If this hair wasn't already retextured, they'd look just like the regular textures, but you could just put them as squares over it and it wouldn't matter. Hold on a sec I'll show you what I'm talking about.

This is the control from a hair I was working on prior to this tutorial. If it's the original mesh and textures, usually it might look like this. You can still just chunk squares over it like what we're doing, it will not matter it'll all come out the same.

Hit CTRL + T and then drag the bottom up until it matches the bottom of the original, like so. Then hit CTRL + V to paste the section again and do the same for all. Cover it just like the originals.

Sometimes you might need to chop off a bit. If so, select the layer it is on, above it you should see the word 'Opacity' click that and drag the arrow to the left. When you can see under it well enough, select the leftovers with the same tool you used in step 13, then press delete.

Press delete then move your opacity back up.

Here's what it looked like at the end, after I moved/resized all the control pieces to fit their original places.
When you're done, merge all your layers by selecting the bottom layer, hitting control, clicking the top layer, and then hitting CTRL + E. After they're merged go to file > save as and save it in your I LIKE EGGS folder under the name of Control, and make sure the file type is DDS.
Yes I put a pic anyway because it's hard to get lost when there isn't a pic to show what you mean.
Okay, now close the control tab in Photoshop and click the texture tab.

Don't feel intimidated, this isn't even hard at all. In fact it's a tad easier than the controls. Open the texture you want to use, be it pooklet or whatever else. Then hit CTRL + A, then CTRL + C. Open your textures tab of the original texture, hit CTRL + V. CTRL + T like above, and pull it down/up to cover the whole image.

Then, we'll go over to our layers box and hit 'channels', hold CTRL and click the icon of the alpha channel.

14. Channels tab
15. Alpha icon
16. Go back to your layers tab, hit CTRL + SHIFT

Should look like this if you did it right. We're not done though so don't save it. :s
See how most of the hair is flowing up and down, but there's some that's flowing left to right? Yeah. Okay, now we're going to delete the texture of the left to right part, and do basically the same thing, but after turning it the right way.

17. Click the selection tool
18. Click the second icon up here which should be 'add'
19. Select it, press delete.

Move your textures over to it just like before, but hit CTRL + T and then move it by the corners while holding shift to make sure that it is straight. Then click the channels tab > ctrl click the alpha icon (just like before) back to layers tab, ctrl + SHIFT

Now delete the 'background' layer and go to file > save as > texture.
Don't close the texture window. Hit CTRL and click the new layer button.

21. New layer button (hold CTRL when you click it)
22. Paint fill button
23. Hit d and make sure the top one is black
24. Fill the background layer.
25. Click the top layer and hit CTRL + E to merge.
Hit CTRL + A and then CTRL + C and go to your tab with the specular on it. Hit CTRL + V and it should paste there.

26/27. Image > Adjustments > Levels
28. Move the black arrow (not the one right where the number 28 is in the pic, the one above it) until your texture is black like this one, I leave a little bit shining through on mine, do it however you like.
29. Hit OK
Either delete the 'background' layer or merge the two. File > Save as > Specular (DDS!)
Now open s3pe and open your main package (mine is ZCNewSeaShainAF) and right click on each img file and hit replace. Before you do that though, you may want to enable DDS preview.

Now file > open > your package that you made with s3oc
Right click on each img and go to replace, then pick your file for that one. It should show the pic on the right so you know what you're going for.


After picking it just click open. When you've done all the img files hit file > save.
Close s3pe, open your I LIKE EGGS folder, and move the Whateverfilenameyouchose.package file into your mods folder.
Open your game and test out the hair, take a pic to use for your thumbnail. I'm just going to use an example from the last hair I did to avoid opening my game.
If your hair had a thumbnail, open that one in photoshop, resize your image to fit it, save it as a PNG. Open your package in s3pe and like you did with the img files, replace the THUMB file. You're done, just save and move it back to your mods folder and congrats, you retextured a hair.
If your hair didn't have a thumbnail, keep reading.
Open your image editor, file > new, these settings.

Then paste your preview pic in there (file > open > preview pic, ctrl + a, ctrl + c, open your 256x256 pic tab, ctrl + v)
Resize it with CTRL + T. If you hold shift and resize from the corners it'll look better, just trust me on that one.
When you're happy with it, hit file > save as > pick a name and make sure it's a PNG. Open your package from I LIKE EGGS and double click on the one that says CASP.

Copy what it says in the instance box (right click > copy) Click cancel.
Right click on the white space of s3pe and click add.

1. Change this to THUM 0x626F60CE.
2. Type 0 in the group box.
3. Paste the instance number you got from CASP.
4. Hit ok.
Right click your newly created THUMB file > replace > your CAS thumbnail you made.
Congrats, you just retextured a hair. Thanks for reading.
Shows over now, you don't have to go home but you can't stay here.
I can't get past step #14. I don't have an alpha channel. How do I make it?
ReplyDeleteI was trying to look for a "adding thumbnails" tutorial and this actually helped! Thanks!
ReplyDelete